Hyundai Palisade: Maintenance / Air cleaner
Filter Replacement

The air cleaner filter can be cleaned for inspection using compressed air.
Do not attempt to wash or to rinse it, as water will damage the filter.
If soiled, the air cleaner filter must be replaced.
Replace the filter according to the Maintenance Schedule.

1. Pull down the air cleaner filter cover (1).

2. Pull down the lever (2) to the UNLOCK position.

3. Replace the air cleaner filter.
4. Reassemble the air cleaner cover in the reverse order.
5. Check that the cover is firmly installed.
Information
If the vehicle is operated in extremely dusty or sandy areas, replace the air cleaner filter more often than the usual recommended intervals (refer to "Maintenance Under Severe Usage Conditions" in this chapter).
NOTICE
- Do not drive with the air cleaner filter removed. This will result in excessive engine wear.
- When removing the air cleaner filter, be careful that dust or dirt does not enter the air intake, or damage may result.
- Use HYUNDAI genuine parts. Use of non-genuine parts could damage the air flow sensor.
 Washer fluid
Checking the Washer Fluid
Level
Check the fluid level in the washer
fluid reservoir and add fluid if necessary.
Plain water may be used if
washer fluid is not available...
 Climate control air filter
Filter Inspection
The climate control air filter should
be replaced according to the
Maintenance Schedule. If the vehicle
is operated in severely air-polluted
cities or on dusty rough roads for a
long period and/or if transporting
pets or occupants smoke inside the
vehicle, then it should be inspected
more frequently and replaced sooner...
Other information:
Hyundai Palisade (LX2) 2020-2025 Owner's Manual: Drive Info display
This display shows the trip distance (1), the average fuel economy (2), and the total driving time (3). The information is combined for each ignition cycle. However, when the engine has been OFF for 4 hours or longer the Drive Info screen will reset...
Hyundai Palisade (LX2) 2020-2025 Owner's Manual: Day/night rearview mirror
[A]: Day, [B]: Night Make this adjustment before you start driving and while the day/night lever is in the day position. Pull the day/night lever towards you to reduce glare from the headlights of the vehicles behind you during night driving. Remember that you lose some rearview clarity in the night position...
Categories
- Manuals Home
- 1st Generation Palisade Owners Manual
- 1st Generation Palisade Service Manual
- AC Inverter
- Rear center seatbelt (3rd row)
- Removing and Storing the Spare Tire
- New on site
- Most important about car
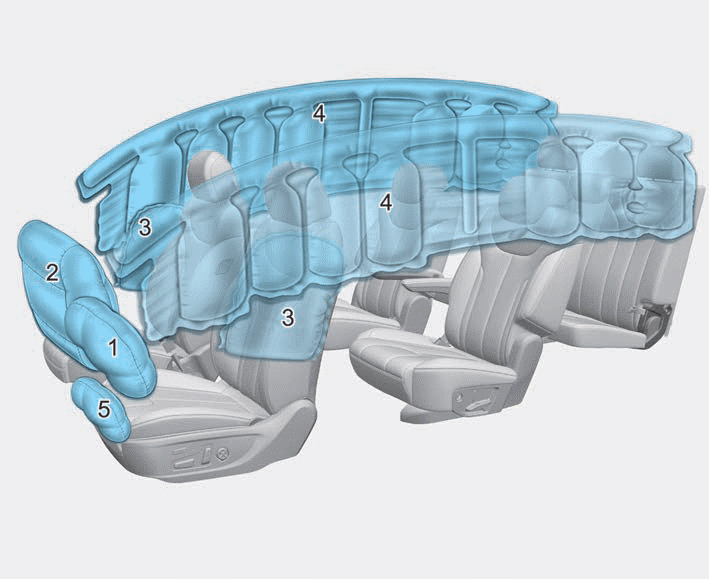
Air Bag - Advanced Supplemental Restraint System

1. Driver's front air bag
2. Passenger's front air bag
3. Side air bag
4. Curtain air bag
5. Driver’s knee airbag
This vehicle is equipped with an Advanced Supplemental Air Bag System for the driver's seat and front passenger's seats.
