Hyundai Palisade (LX2): Interior Trim / Center Pillar Trim
Components and components location

1. Center pillar lower trim
|
2. Center pillar upper trim
|
Repair procedures
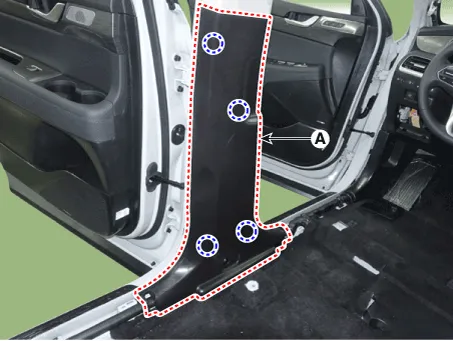
[Center pillar lower trim]
| • |
When removing with a flat-tip screwdriver or remover, wrap protective
tape around the tools to prevent damage to components.
|
| • |
Put on gloves to prevent hand injuries.
|
|
| • |
Take care not to bend or scratch the trim and panels.
|
|
| 1. |
Remove the front door body side weatherstrip.
|
| 2. |
Remove the rear door body side weatherstrip.
|
| 3. |
Remove the front door scuff trim.
(Refer to Interior Trim - "Door Scuff Trim")
|
| 4. |
Remove the rear door scuff trim.
(Refer to Interior Trim - "Rear Scuff Trim")
|
| 5. |
Open the front seat belt lower cover (A) and loosen the mounting bolt.

|
| 6. |
Using a flat-tip screwdriver or remover and remove the center pillar
lower trim (A).
|
| 7. |
To install, reverse removal procedure.
| •
|
Replace any damaged clips (or pin-type retainers).
|
|
|
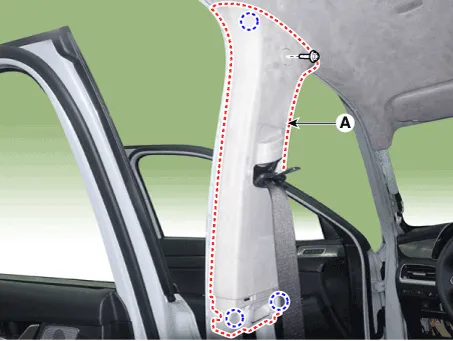
[Center pillar upper trim]
| • |
When removing with a flat-tip screwdriver or remover, wrap protective
tape around the tools to prevent damage to components.
|
| • |
Put on gloves to prevent hand injuries.
|
|
| • |
Take care not to bend or scratch the trim and panels.
|
|
| 1. |
Remove the center pillar lower trim.
(Refer to Interior Trim -"Center Pillar Lower Trim")
|
| 2. |
Loosen the mounting bolt and remove the center pillar upper trim (A).
|
| 3. |
To install, reverse removal procedure.
| •
|
Replace any damaged clips (or pin-type retainers).
|
|
|
Components and components location
Component Location
1. Front pillar trim
Components and components location
Component Location
1. Rear transverse trim
Other information:
Description and operation
Description
The auto defogging sensor is installed on the front window glass. The sensor
judges and sends signal if moisture occurs to blow out wind for defogging. The
air conditioner control module receives signal from the sensor and restrains
moisture and eliminate defog by controlling the intak
Components and components location
Components
1. Remote control switch (Audio
swtich)
2. Remote control switch (Cruise
control switch)
Schematic diagrams
Circuit Diagram
Repair procedures
Removal
1.


