Hyundai Palisade: Airbag Module / Driver Airbag (DAB) Module and Clock Spring
Hyundai Palisade (LX2) 2020-2025 Service Manual / Restraint / Airbag Module / Driver Airbag (DAB) Module and Clock Spring
Components and components location
| Components |

| 1. Driver Airbag (DAB) 2. Steering Wheel |
3. Clock Spring |
Description and operation
| Description |
The Driver Airbag (DAB) is installed in the steering wheel and electrically
connected to SRSCM via the clock spring. It protects the driver by deploying
the airbag when frontal crash occurs. The SRSCM determines deployment of the
Driver Airbag (DAB).
|

Repair procedures
| Inspection |
Driver Airbag (DAB)
If any improper parts are found during the following inspection, replace the
airbag module with a new one.
|

| 1. |
Check pad cover for dents, cracks or deformities.
|
| 2. |
Check the airbag module for denting, cracking or deformation.
|
| 3. |
Check hooks and connectors for damage, terminals for deformities, and
harness for binds.
|
| 4. |
Check airbag inflator case for dents, cracks or deformities.
|

Clock Spring
| 1. |
If any improper parts are found during inspection, replace the clock
spring with a new one.
|
| 2. |
Check connectors and protective tube for damage, and terminals for deformities.
|


| Removal |
| 1. |
Set the front tires straight-ahead.
|
| 2. |
Disconnect the battery negative cable and wait for at least three minutes
before beginning work.
|
| 3. |
Put a flat tool (Ø5mm) into a guide hole located in the bottom of steering
wheel and press a DAB fastening pin.
|

| 4. |
Put a flat tool (Ø5mm) into a guide hole located in the left/right of
steering wheel and press a DAB fastening pin.
|


| 5. |
Release the connector locking (A), then disconnect the DAB connector
(C) and horn connector (B).
|

| 6. |
Remove the steering wheel.
(Refer to Steering System - "Steering Column and Shaft")
|
| 7. |
Loosen the steering wheel column shroud panel.
(Refer to Body - "Steering Wheel Column Shroud Panel")
|
| 8. |
Disconnect the clock spring (A) and horn connector (B), then remove
the clock spring.
|

| Installation |
| 1. |
Set the front tires straight-ahead.
|
| 2. |
Turn the ignition switch OFF.
|
| 3. |
Disconnect the battery negative cable from the battery and wait for
at least three minutes before beginning the work.
|
| 4. |
Connect the clock spring harness connector and horn harness connector
to the clock spring.
|
| 5. |
Factory setting for the clock spring is neutral.
|


| 6. |
Clock spring manual neutral setting procedure.
|


| 7. |
Install the steering wheel column shroud and the steering wheel.
(Refer to Steering System - "Steering Column and Shaft")
|
| 8. |
Connect the Driver Airbag (DAB) module connector and horn connector,
and then install the Driver Airbag (DAB) module on the steering wheel.
|
| 9. |
Connect the battery negative cable.
|
| 10. |
After installing the airbag, confirm proper system operation :
|

 Passenger Airbag (PAB) Module
Components and components location
Components
[LHD]
1. Passenger airbag (PAB)
Description and operation
Description
The passenger airbag (PAB) is installed inside the crash pad and protects the
front passenger in the event of a frontal crash...
Other information:
Hyundai Palisade (LX2) 2020-2025 Service Manual: Components and components location
..
Hyundai Palisade (LX2) 2020-2025 Service Manual: Power Door Lock Actuators
Repair procedures Inspection Front Door Lock Module Inspection 1. Remove the front door trim. (Refer to Body - "Front Door Trim") 2. Remove the front door module. (Refer to Body - "Front Door Module") 3...
Categories
- Manuals Home
- 1st Generation Palisade Owners Manual
- 1st Generation Palisade Service Manual
- Theft-alarm system
- Child-Protector Rear Door Locks
- Power Outlet
- New on site
- Most important about car
How Does the Air Bag System Operate?
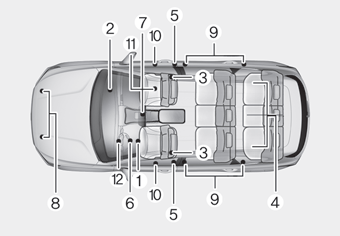
The SRS consists of the following components:
1. Driver's front air bag module
2. Passenger's front air bag module
3. Side air bag modules
4. Curtain air bag modules
5. Retractor pre-tensioner
6. Air bag warning light
7. SRS control module (SRSCM)/
Rollover sensor
8. Front impact sensors
9. Side impact sensors
10.Side pressure sensors
11. Occupant classification system
12. Driver’s knee airbag module

Copyright © 2025 www.hpalisadelx.com