Hyundai Palisade: Hood / Hood Lift
Repair procedures
| Replacement |
|
| 1. |
Using a screwdriver, lift the socket clips (A) up slightly on both ends
of the lifter (B).
|
| 2. |
Push the socket of the lifter into the bracket for installation.
|
 Hood Insulator Pad
Repair procedures
Replacement
1.
Using a clip remover, remove the clips and then the hood insulator pad
(A).
•
Be careful not to scratch the hood panel...
 Hood Weatherstrip
Repair procedures
Replacement
1.
Remove the hood weatherstrip (A).
•
Be careful not to scratch the hood weatherstrip...
Other information:
Hyundai Palisade (LX2) 2020-2025 Service Manual: Front Radar Unit
Specifications Specification Item Specification Power supply (V) 12 Operation voltage (V) 9 - 16 Description and operation Description The smart cruise control unit is installed on the front right-hand side of the chassis...
Hyundai Palisade (LX2) 2020-2025 Service Manual: Components and components location
..
Categories
- Manuals Home
- 1st Generation Palisade Owners Manual
- 1st Generation Palisade Service Manual
- Theft-alarm system
- Power Outlet
- AC Inverter
- New on site
- Most important about car
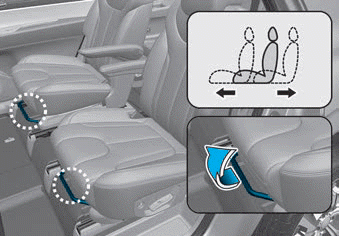
Rear Seats
Rear seat adjustment

Forward and rearward (2nd row seat)
To move the seat forward or rearward:
1. Pull the seat slide adjustment lever up and hold it.
2. Slide the seat to the position you desire.
Copyright © 2025 www.hpalisadelx.com


