Hyundai Palisade: Trunk Trim / Repair procedures
Hyundai Palisade (LX2) 2020-2025 Service Manual / Body (Interior and Exterior) / Trunk Trim / Repair procedures
| Replacement |
|

|

| 1. |
Remove the rear seat.
(Refer to Rear Seat - "Rear Seat Assembly")
|
| 2. |
Remove the rear door scuff trim.
(Refer to Interior Trim - "Door Scuff Trim")
|
| 3. |
Remove the luggage mat assembly (A).
|
| 4. |
Remove the cargo screen (B).
|
| 5. |
Loosen the mounting clips and remove the rear transverse trim (C).
|
| 6. |
Loosen the mounting screws, remove the luggage side trim (D).
|
| 7. |
To install, reverse removal procedure.
|
| 8. |
Press the lock pin and separate the various connectors.
|


 Trunk Trim
..

Other information:
Hyundai Palisade (LX2) 2020-2025 Service Manual: Center Fascia Panel
Components and components location Component Location 1. Front center fascia panel 2. Rear center fascia panel Repair procedures Replacement [Front center facsia panel] • When removing with a flat-tip screwdriver or remover, wrap protective tape around the tools to prevent damage to components...
Hyundai Palisade (LX2) 2020-2025 Service Manual: Torque Converter Clutch Control Solenoid Valve (T/CON_VFS)
Description and operation Description • Torque converter control solenoid valve (T/CON_VFS) is attached to the valve body. • This variable force solenoid valve indirectly controls the hydraulic pressure inside the torque converter...
Categories
- Manuals Home
- 1st Generation Palisade Owners Manual
- 1st Generation Palisade Service Manual
- Check Tire Pressure
- Child-Protector Rear Door Locks
- Changing Tires
- New on site
- Most important about car
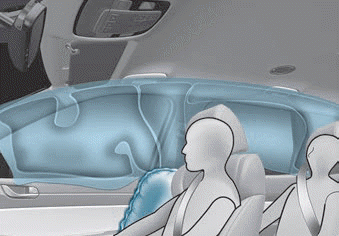
Air bag inflation conditions
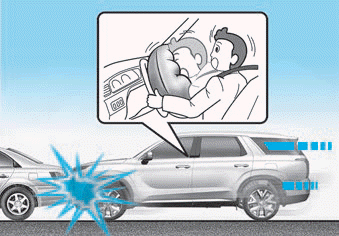
Front air bags
Front air bags and the driver's knee air bag are designed to inflate in a frontal collision depending on the the severity of impact of the front collision.


Copyright © 2025 www.hpalisadelx.com