Hyundai Palisade: Timing System / Drive Belt
Repair procedures
| • |
Be careful not to damage the parts located under the vehicle
(floor under cover, fuel filter, fuel tank and canister) when
raising the vehicle using the lift.
(Refer to General Information - "Lift and Support Points")
|
|
| 1. |
Remove the engine room under cover.
(Refer to Engine and Transaxle Assembly - "Engine Room Under Cover")
|
| 2. |
To release the tension, turn the drive belt tensioner counterclockwise
and then remove the drive belt (A).

| •
|
Install the drive belt in the following order :
Crankshaft damper pulley → A/C compressor pulley → Idler
Pulley → alternator pulley → Idler pulley → water pump
pulley → drive belt auto tensioner pulley.
Rotate the auto tensioner arm by turning the auto tensioner
arm boss (A) counterclockwise using a wrench. After
installing the drive belt to the auto tensioner pulley,
slowly release the auto tensioner arm.

|
|
|
| 3. |
Install in the reverse order of removal.
|
Check belt for maintenance and V-ripped part for abnormal wear. Replace if necessary.
| • |
Do not bend, twist or turn the drive belt inside out.
|
| • |
Do not allow the drive belt to come into contact with oil, water
and steam.
|
|
Visually check the belt for excessive wear, frayed cords etc.
If any defect is found, replace the drive belt.
| • |
Cracks on the rib side of a belt are considered acceptable.
If the belt has chunks missing from the ribs, it should be replaced.

|
|
Components
1. Timing chain cover
2. Oil pump sprocket
3. Oil pump chain
4. Oil pump tensioner assembly
5. Crankshaft oil pump sprocket
6...
Repair procedures
Removal and Installation
•
Be careful not to damage the parts located under the vehicle
(floor under cover, fuel filter, fuel tank and canister) when
raising the vehicle using the lift...
Other information:
Description and operation
Description
•
When TCM supplies variable current to solenoid valve, hydraulic pressure
of 37R clutch is controlled directly by solenoid valve.
•
37R Clutch control solenoid valve is a Variable Force Solenoid (VFS)
type...
Troubleshooting
Problem Symptoms Table
Before replacing or repairing air conditioning components, first determine if
the malfunction is due to the refrigerant charge, air flow or compressor.
Use the table below to help you find the cause of the problem...
Categories
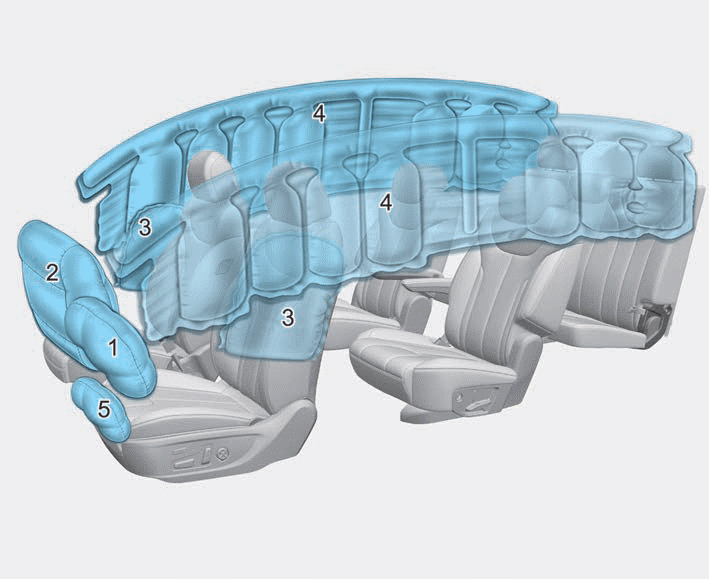
1. Driver's front air bag
2. Passenger's front air bag
3. Side air bag
4. Curtain air bag
5. Driver’s knee airbag
This vehicle is equipped with an
Advanced Supplemental Air Bag
System for the driver's seat and front
passenger's seats.
read more


 Components and components location
 Idler
Idler