Hyundai Palisade: Intake And Exhaust System / Muffler
Components and components location
| Components |
[2WD]

| 1. Front muffler 2. Catalytic converter & Center muffler assembly 3. Rear muffler |
4. Gasket 5. Hanger |
[AWD]

| 1. Front muffler 2. Catalytic converter & Center muffler assembly 3. Rear muffler |
4. Gasket 5. Hanger |
Repair procedures
| Removal and Installation |
|

Front Muffler
| 1. |
Remove the engine room under cover.
(Refer to Engine and Transaxle Assembly - "Engine Room Under Cover")
|
| 2. |
Remove the roll rod bracket.
(Refer to Engine and Transaxle Assembly - "Engine Mounting")
|
| 3. |
Remove the sub frame.
(Refer to Suspension System - "Sub Frame")
|
| 4. |
Remove the front muffler (A).
|


| 5. |
Install in the reverse order of removal.
|

Catalytic converter & Center Muffler Assembly
| 1. |
Remove the catalytic converter & center muffler assembly (A).
|

| 2. |
Install in the reverse order of removal.
|

Rear Muffler
| 1. |
Remove the rear muffler (A).
|

| 2. |
Install in the reverse order of removal.
|

Replacement procedure of catalytic converter & center muffler assembly using
clamp
Under warranty : Replace the catalytic converter & center muffler assembly.
Out of warranty : Catalytic converters and center muffler assemblies can be
replaced in the following procedure:
| 1. |
Check if the clamping part of the catalytic converter & center muffler
assembly is damaged or deformed.
If the muffler is too corroded to clamp, replace the catalytic converter
& center muffler assembly.
|

| 2. |
Record the gap (A, B) between the tail pipe and the rear bumper.
|

| 3. |
Remove the catalytic converter & center muffler assembly (A).
|

| 4. |
Cut the catalytic converter & center muffler assembly as in the instruction
below.
[Replacement muffler]
|


| 5. |
Install the center muffler.
|


 Exhaust Manifold
Components and components location
Components
1. LH Exhaust manifold gasket
2. LH Exhaust manifold
3. LH Heat protector
4...

Other information:
Hyundai Palisade (LX2) 2020-2025 Owner's Manual: Child-Protector Rear Door Locks
The child safety lock is provided to help prevent children seated in the rear from accidentally opening the rear doors. The rear door safety locks should be used whenever children are in the vehicle. The child safety lock is located on the edge of each rear door...
Hyundai Palisade (LX2) 2020-2025 Service Manual: ESP OFF Switch
Description and operation Description 1. The ESP OFF switch is for the user to turn off the ESP system. 2. The ESP OFF lamp is on when ESP OFF switch is engaged. Repair procedures Removal 1...
Categories
- Manuals Home
- 1st Generation Palisade Owners Manual
- 1st Generation Palisade Service Manual
- Wireless Cellular Phone Charging System
- Reverse Parking Aid Function
- Electrochromatic Mirror (ECM) with homelink system
- New on site
- Most important about car
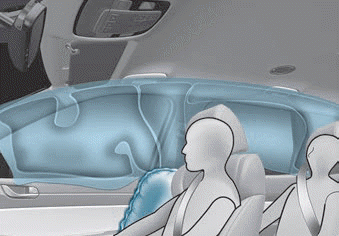
Air bag inflation conditions
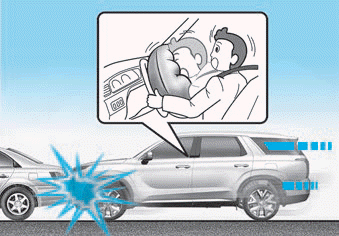
Front air bags
Front air bags and the driver's knee air bag are designed to inflate in a frontal collision depending on the the severity of impact of the front collision.


Copyright © 2025 www.hpalisadelx.com