Hyundai Palisade: Side View Mirrors / Side view mirror adjustment, Folding the side view mirrors
Hyundai Palisade (LX2) 2020-2025 Owner's Manual / Convenient Features of Your Vehicle / Mirrors / Side View Mirrors / Side view mirror adjustment, Folding the side view mirrors
Side view mirror adjustment

Adjusting the side view mirrors
1. Move the lever (1) either to the L (left side) or R (right side) to select the side view mirror you would like to adjust.
2. Use the mirror adjustment control switch (2) to position the selected mirror up, down, left or right.
3. After adjustment, move the lever (1) to the middle to prevent inadvertent adjustment.
NOTICE
- The mirrors stop moving when they reach the maximum adjusting angles, but the motor continues to operate while the switch is pressed. Do not press the switch longer than necessary, because this can damage the motor.
- Do not attempt to adjust the side view mirrors by hand, because this can damage the motor.
Folding the side view mirrors

To fold the side view mirrors, grasp the housing of the mirror and then fold it inwards.
 Side View Mirrors
Make sure to adjust the side view
mirrors to your desired position
before you begin driving.
Your vehicle is equipped with both
left-hand and right-hand side view
mirrors...
 Reverse Parking Aid Function
When you move the shift button to
the R (Reverse) position, the side
view mirror(s) will rotate downwards
to aid with driving in reverse. The
position of the side view mirror
switch (1) determines whether or not
the mirrors will move:
Left/Right : When either the L (Left) or
R (Right) switch is selected,
both side view mirrors
will move...
Other information:
Hyundai Palisade (LX2) 2020-2025 Service Manual: Components and components location
..
Hyundai Palisade (LX2) 2020-2025 Service Manual: Seat Heater Switch
Components and components location Components 1. Front seat heater switch 2. Rear seat heater switch Schematic diagrams Circuit Diagram Front Seat No Connector A 1 C_CAN (High) 2 C_CAN (Low) 3 - 4 LIN 5 - 6 Auto hold signal 7 - 8 Battery (+) 9 IGN 10 Illumination (+) 11 - 12 Illumination (-) 13 Ground 14 DETENT 15 - 16 PDW signal 17 Steering wheel heater signal 18 DBC signal 19 ISG signal 20 SVM/RVM signal 21 ISG indicator 22 SVM indicator 23 PDW indicator 24 Steering whell heater indicator 2nd Seat No Connector A 1 Battery (+) 2 ISG Power(+) 3 Illumination (+) 4 Sensor REF (+5V) 5 Mode actuator feadback 6 Temperature actuator feedback 7 Mode actuator (Vent) 8 Mode actuator (Defrost) 9 Temperature actuator (Cooling) 10 Temperature actuator (Heating) 11 DETENT (-) 12 K-LINE 13 LIN line (Rear left seat) 14 LIN line (Rear right seat 15 - 16 Illumination (-) 17 IGN 2 18 IGN 1 19 Blower motor (+) 20 - 21 Rear FET (Drain feedback) 22 Rear FET (Gate) 23 Left heater swtich 24 Left heater indicator (High) 25 Left heater indicator (Middle) 26 Left heater indicator (Low) 27 Right heater swtich 28 Right heater indicator (High) 29 Right heater indicator (Middle) 30 Right heater indicator (Low) 31 Sensor ground 32 Ground Repair procedures Removal Front seat 1...
Categories
- Manuals Home
- 1st Generation Palisade Owners Manual
- 1st Generation Palisade Service Manual
- Theft-alarm system
- Electronic Child Safety Lock System
- Side view mirror adjustment, Folding the side view mirrors
- New on site
- Most important about car
Rear Seats
Rear seat adjustment
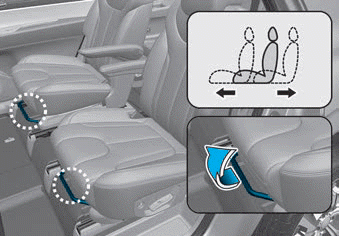
Forward and rearward (2nd row seat)
To move the seat forward or rearward:
1. Pull the seat slide adjustment lever up and hold it.
2. Slide the seat to the position you desire.

Copyright © 2025 www.hpalisadelx.com