Hyundai Palisade: Surround View Monitor (SVM) / Surround View Monitor (SVM) Unit
Hyundai Palisade (LX2) 2020-2025 Service Manual / Advanced Driver Assistance System (ADAS) / Surround View Monitor (SVM) / Surround View Monitor (SVM) Unit
Components and components location
| Components |

|
No |
Connector A |
|
1 |
ACC |
|
2 |
LED |
|
3 |
EXT Ground |
|
4 |
Y Shield |
|
5 |
- |
|
6 |
C-CAN Low |
|
7 |
Y Video ground |
|
8 |
- |
|
9 |
- |
|
10 |
Rear camera power |
|
11 |
Left camera power |
|
12 |
Right camera power |
|
13 |
Ignition |
|
14 |
AVM switch |
|
15 |
- |
|
16 |
C Shield |
|
17 |
- |
|
18 |
C- CAN High |
|
19 |
C video ground |
|
20 |
C video output |
|
21 |
- |
|
22 |
- |
|
23 |
Left camera ground |
|
24 |
Right camera ground |

Repair procedures
| Removal |
| 1. |
Disconnect the negative (-) battery terminal.
|
| 2. |
Remove the carash pad lower panel.
(Refer to Body - "Crash Pad Lower Panel")
|
| 3. |
Disconnect the SVM unit connector.
|
| 4. |
Remove the SVM unit after loosening the mounting bolts and screw.
|
| Installation |
| 1. |
Install the AVN head unit after connecting the AVN head unit connectors
and cable.
|
| 2. |
Install the crash pad lower panel.
|
| 3. |
Connect the negative (-) battery terminal.
|
| Inspection |
| How to Check the AVN Head Unit When Replacing It (Variant Coding) |
The AVN head unit performs basic audio, video and navigation functions.
It also receives overall information about the vehicle from other units (SWRC,
FATC, BCM, PGS, AVM, Cluster, TMU, ECS, etc.) through CAN communication and
forwards it to the driver.
Thus, when replacing the AVN head unit, be sure to enter detailed option information
of each vehicle model into the new AVN unit for proper operation of AVN system.
This process is called variant coding.
The following process describes the GDS based input method only.
|
| 1. |
Check the options installed on the vehicle before proceeding to the
AVN head unit variant coding.
|
| 2. |
Select a vehicle and then select "variant coding", an additional function
of the AVN head unit.
|
| 3. |
Set up the options installed on vehicles.
|
| 4. |
Follow the guidance of on-screen information and stand by. Wait until
it is completely saved and then exit.
|
 Troubleshooting
Troubleshooting
1)
After replacing H/UNIT, always check that the system operates
properly...
 Surround View Monitor (SVM) Camera
Components and components location
Components
[Ultra Optical Camera - RH/LH]
[Ultra Optical Camera - Front]
[Ultra Optical Camera - Rear]
Repair procedures
Removal
•
In case of bad quality or poor focus, be sure to check the camera
lense surface condition and foreign materials...
Other information:
Hyundai Palisade (LX2) 2020-2025 Service Manual: TPMS Sensor
Description and operation Description 1. General description WU is a sensor placed in the tire that reports pressure and temperature. The WU is mounted inside the wheels, fixed to the valve. The angle between the valve and the housing of the WU is variable...
Hyundai Palisade (LX2) 2020-2025 Owner's Manual: Locking your vehicle
To lock your vehicle using the door handle button or the Smart Key: 1.Make sure all doors, the hood and the liftgate are closed. 2.Make sure you have the smart key in your possession. 3.Press either the button on the door handle or the Door Lock button (1) on the smart key...
Categories
- Manuals Home
- 1st Generation Palisade Owners Manual
- 1st Generation Palisade Service Manual
- Normal Maintenance Schedule (3.8 GDI)
- Reverse Parking Aid Function
- Removing and Storing the Spare Tire
- New on site
- Most important about car
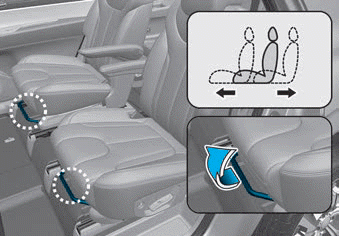
Rear Seats
Rear seat adjustment

Forward and rearward (2nd row seat)
To move the seat forward or rearward:
1. Pull the seat slide adjustment lever up and hold it.
2. Slide the seat to the position you desire.
Copyright © 2025 www.hpalisadelx.com


