Hyundai Palisade: Auto Lighting Control System / Auto Light Sensor
Hyundai Palisade (LX2) 2020-2025 Service Manual / Body Electrical System / Auto Lighting Control System / Auto Light Sensor
Repair procedures
| Inspection |
Check if the auto light control operates like a timing chart shown below. Tail
lamp output and head lamp (Low) output is controlled based on the auto light
sensor's input (illumination intensity) when the Auto Light Switch in Multi-Function
Switch is turned ON, and the vehicle is in IGN1 or IGN2 ON Mode. If IGN1 = ON,
BCM detects this voltage, and if the voltage exceeds rated voltage, then auto
light failure occurs. (below 4V or above 6V)
|
In the state of IGN1 ON, when multi function switch module detects auto light
switch on, tail lamp relay output and head lamp low relay output are controlled
according to auto light sensor's input.The auto light control doesn't work if
the pin sunlight supply (5V regulated power from Ignition 1 power to sunlight
sensor) is in short circuit with the ground.If IGN1 ON, The BCM monitors the
range of this supply and raises up a failure as soon as the supply’s voltage
is out of range. Then this failure occurs and as long as this is present, the
head lamp must be turned on without taking care about the sunlight level provided
by the sensor.This is designed to prevent any head lamp cut off when the failure
occurs during the night.


| Removal |
| 1. |
Disconnect the negative (-) battery terminal.
|
| 2. |
Remove the photo & auto light sensor (A) from crash pad upper side by
using a flat-tip screwdriver.
|
| 3. |
Remove the auto light connector.
|
| Installation |
| 1. |
Reconnect the auto light connector.
|
| 2. |
Install the auto light sensor.
|
 Description and operation
Description
It's a system that uses illumination sensor to automatically turn ON the tail
lamp and head lamp based on the change in surrounding environment's illumination
condition...
Other information:
Hyundai Palisade (LX2) 2020-2025 Owner's Manual: Electronic Child Safety Lock System
If you push the Electronic child safety lock switch and the indicator illuminates, rear passengers cannot open the rear door from inside the vehicle. To cancel the Electronic child safety lock system, push the Electronic child safety lock system switch one more time and then the indicator turns off...
Hyundai Palisade (LX2) 2020-2025 Service Manual: Battery Sensor
Description and operation Description Vehicles have many control units that use more electricity. These units control their own system based on information from various sensors. It is important to provide a stable power supply as these sensors bring diverse information...
Categories
- Manuals Home
- 1st Generation Palisade Owners Manual
- 1st Generation Palisade Service Manual
- Emergency liftgate safety release
- Auto Hold
- Electrochromatic Mirror (ECM) with homelink system
- New on site
- Most important about car
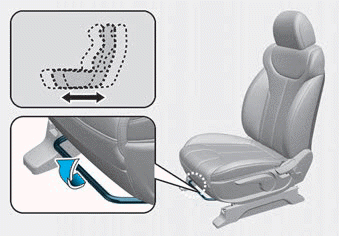
Manual adjustment
The front seat can be adjusted by using the levers located on the outside of the seat cushion. Before driving, adjust the seat to the proper position so that you can easily control the steering wheel, foot pedals and controls on the instrument panel.

Copyright © 2025 www.hpalisadelx.com


