Hyundai Palisade: Crash Pad / Crash Pad Garnish
Components and components location

1. Crash pad center garnish
3. Crash pad garnish [LH]
|
2. Crash pad garnish [RH]
|
Repair procedures
[Crash pad center garnish]
| • |
When removing with a flat-tip screwdriver or remover, wrap protective
tape around the tools to prevent damage to components.
|
| • |
Put on gloves to prevent hand injuries.
|
|
| • |
Use a plastic panel removal tool to remove interior trim pieces
without marring the surface.
|
| • |
Take care not to bend or scratch the trim and panels.
|
|
| 1. |
Remove the crash pad side cover [RH].
(Refer to Crash pad - "Crash pad side cover")
|
| 2. |
Loosen the mounting screws and remove the crash pad center garnish (A).

|
| 3. |
Separate the start button connector (A).

|
| 4. |
To install, reverse removal procedure.
| •
|
Replace any damaged clips (or pin-type retainers).
|
| •
|
Make sure the connector are connected in properly.
|
|
|
[Crash pad garnish LH]
| • |
When removing with a flat-tip screwdriver or remover, wrap protective
tape around the tools to prevent damage to components.
|
| • |
Put on gloves to prevent hand injuries.
|
|
| • |
Use a plastic panel removal tool to remove interior trim pieces
without marring the surface.
|
| • |
Take care not to bend or scratch the trim and panels.
|
|
| 1. |
Remove the rear center fascia panel.
(Refer to Crash pad - "Center fascia panel")
|
| 2. |
Using a flat-tip screwdriver and remove the crash pad garnish [LH] (A).

|
| 3. |
To install, reverse removal procedure.
| •
|
Replace any damaged clips (or pin-type retainers).
|
|
|
[Crash pad garnish RH]
| • |
When removing with a flat-tip screwdriver or remover, wrap protective
tape around the tools to prevent damage to components.
|
| • |
Put on gloves to prevent hand injuries.
|
|
| • |
Use a plastic panel removal tool to remove interior trim pieces
without marring the surface.
|
| • |
Take care not to bend or scratch the trim and panels.
|
|
| 1. |
Remove the rear center fascia panel.
(Refer to Crash pad - "Center fascia panel")
|
| 2. |
Remove the crash pad center garnish.
(Refer to Crash pad - "Crash pad garnish")
|
| 3. |
Using a flat-tip screwdriver and remove the crash pad garnish [RH] (A).

|
| 4. |
To install, reverse removal procedure.
| •
|
Replace any damaged clips (or pin-type retainers).
|
|
|
Components and components location
Component Location
1. Front center fascia panel
2...
Repair procedures
Replacement
•
When removing with a flat-tip screwdriver or remover, wrap protective
tape around the tools to prevent damage to components...
Other information:
Inspection
1.
After disconnecting the vapor hose from the PCV valve, remove the PCV
valve.
2.
Reconnect the PCV valve to the vapor hose.
3.
Run the engine at idle, then put a finger over the open end of the PCV
valve and make sure that intake manifold vacuum can be felt...
Repair procedures
Removal
1.
Disconnect (-) battery terminal.
2.
Using a fastener remover (C), remove the mirror (A) as illustration
below.
•
Protect mirror from removing tool with cloth (B) wrapped...
Categories
Rear seat adjustment
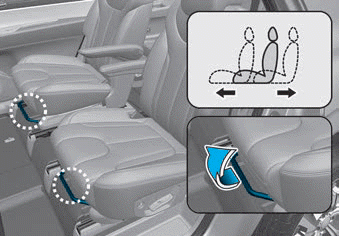
Forward and rearward
(2nd row seat)
To move the seat forward or rearward:
1. Pull the seat slide adjustment
lever up and hold it.
2. Slide the seat to the position you
desire.
read more


 Center Fascia Panel
 Crash Pad Under Cover