Hyundai Palisade (LX2): Brake System / Rear Disc Brake
Components and components location
| Components |
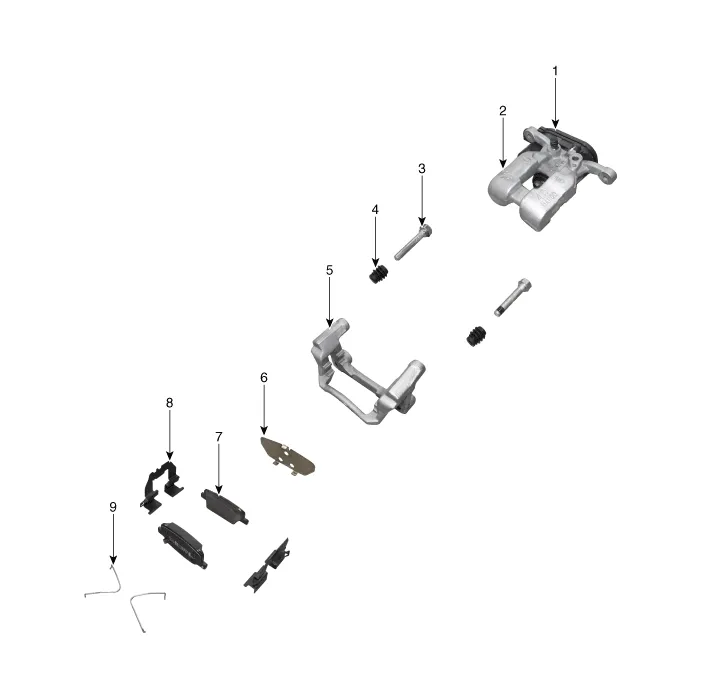
| 1. EPB actuator 2. Caliper body 3. Guide rod pin 4. Guide rod boot 5. Caliper carrier |
6. Pad inner shim 7. Brake pad 8. Pad retainer 9. Pad return spring |
Repair procedures
| Removal |
|

| 1. |
Before removing the rear caliper, perform “Brake Pad Replacement Mode”
using the GDS.
|


| 2. |
Select C2 (Release) on the screen below.
|

| 3. |
Loosen the wheel nuts slightly.
Raise the vehicle, and make sure it is securely supported.
|
| 4. |
Remove the rear wheel and tire (A) from the rear hub.
|


| 5. |
Disconnect the EPB actuator connector (A).
|

| 6. |
Remove the hose after loosening the brake hose bolt (A) from the caliper.
|

| 7. |
Remove the caliper body (A) after loosening the guide rod bolt.
|

| 8. |
Remove the return spring (A).
|

| 9. |
Remove the brake pad (A).
|

| 10. |
Remove the pad retainer (A).
|

| 11. |
Remove the caliper carrier (A) after loosening the caliper mounting
bolt.
|

| 12. |
Remove the rear brake disc (A) after loosening the screw.
|

| Inspection |
| 1. |
Check the brake disc for damage and cracks.
|
| 2. |
Remove all rust and contamination from the surface, and measure the
disc thickness at 24 points, at least, of same distance (5mm) from the
brake disc outer circle.
|

| 3. |
If wear exceeds the limit, replace the discs and pad assembly left and
right of the vehicle.
|
| 1. |
Place a dial gauge about 10mm (0.20 in.) from the outer circumference
of the brake disc, and measure the runout of the disc.
|

| 2. |
If the runout of the brake disc exceeds the limit specification, replace
the disc, and then measure the runout again.
|
| 3. |
If the runout cannot be corrected by changing the position of the brake
disc, replace the brake disc.
|
| Installation |
| 1. |
To install, reverse the removal procedures.
|
| 2. |
When istalling, press and rotate the piston into the caliper body until
it is fully retracted.
|


| 3. |
After installation, bleed the brake system.
(Refer to Brake system - "Brake system Bleeding")
(Refer to Brake System - "ESP System Bleeding)
|
| 4. |
After installing the rear caliper (EPB applied), perform “Brake Pad
Replacement Mode” using the GDS.
|


| 5. |
Select C1 (Apply) on the screen below.
|

| 6. |
After replacing the rear caliper, make sure that the caliper is installed
correctly by performing “Check assembling (ECU replaced)” from the option.
|

Components and components location Components 1. Caliper body 2. Pad inner shim 3. Brake pad 4. Pad retainer 5.
Repair procedures Replacement • Be careful not to damage the parts located under the vehicle (floor under cover, fuel filter, fuel tank and canister) when raising the vehicle using the lift.
Other information:
Hyundai Palisade (LX2) 2020-2026 Service Manual: Cluster Ionizer
Description and operation Description The cluster ionizer makes disinfection and decomposition of bad smell from the air-conditioner or inflow air. And it cleans the inside air of a vehicle. When the ignition switch is ON, the ionizer runs "CLEAN" mode and then "ION" mode, switching between both modes.
Hyundai Palisade (LX2) 2020-2026 Service Manual: Rear Temperature Control Actuator
Repair procedures Replacement 1. Disconnect the negative (-) battery terminal. 2. Remove the luggage side trim (Refer to Body - "Luggage Side Trim ") 3. Separate the rear temperature actuator connector (A), loosen the mounting screws a
Categories
- Manuals Home
- Hyundai Palisade Owners Manual
- Hyundai Palisade Service Manual
- Automatic Transaxle System (A8LF1)
- Resetting the Driver's Seat Memory System
- Body Electrical System
- New on site
- Most important about car
