Hyundai Palisade: Coupling Assembly / Relif Valve
Description and operation
| Description |
When the pressure inside the coupling exceeds the set pressure value, this valve
maintains the pressure under the set value by discharging the partial or whole
amount.
Repair procedures
| Removal |
| 1. |
Remove the coupling assembly.
(Refer to 4 Wheel Drive (AWD) System - "Coupling Assembly")
|
| 2. |
Remove the relief valve (A) from the coupling assembly.
|


| Installation |
| 1. |
To install, reverse the removal procedures.
|
|


 Pressure Sensor
Description and operation
Description
The AWD ECU makes a Motor Pump(Actuator) turn round for generating an oil pressure.
And then it presses a multiple disk clutch and transfers the generated torque
into rear wheels...

Other information:
Hyundai Palisade (LX2) 2020-2025 Service Manual: Door Step Trim
C..
Hyundai Palisade (LX2) 2020-2025 Owner's Manual: Transmission Shift Indicator
Automatic transmission shift indicator This indicator displays the gear position of the shift button. ■ Type A ■ Type B Shift indicator pop-up (if equipped) The pop-up indicates the current gear position displayed in the cluster for about 2 seconds when shifting into other positions (P/R/N/D)...
Categories
- Manuals Home
- 1st Generation Palisade Owners Manual
- 1st Generation Palisade Service Manual
- Electrochromatic Mirror (ECM) with homelink system
- AWD Operation
- Check Tire Pressure
- New on site
- Most important about car
Air bag inflation conditions
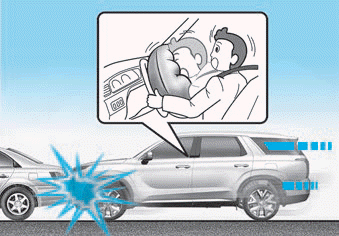
Front air bags
Front air bags and the driver's knee air bag are designed to inflate in a frontal collision depending on the the severity of impact of the front collision.


Copyright © 2025 www.hpalisadelx.com