Hyundai Palisade: Floor Carpet / Repair procedures
Hyundai Palisade (LX2) 2020-2025 Service Manual / Body (Interior and Exterior) / Floor Carpet / Repair procedures
| Replacement |
|

|

| 1. |
Remove the front seat assembly.
(Refer to Front Seat - "Front Seat Assembly")
|
| 2. |
Remove the rear seat cushion assembly.
(Refer to Rear Seat - "Rear Seat Assembly")
|
| 3. |
Remove the floor console assembly.
(Refer to Floor Console - "Floor Console Assembly")
|
| 4. |
Remove the cowl side trim.
(Refer to Interior Trim - "Cowl Side Trim")
|
| 5. |
Remove the center pillar lower trim.
(Refer to Interior Trim - "Center Pillar Trim")
|
| 6. |
Remove the accelerator pedal module.
(Refer to Fuel system - "accelerator pedal")
|
| 7. |
Remove the front floor carpet assembly (A) , and rear floor carpet assembly
(B).
|
| 8. |
To install, reverse removal procedure.
|


 Floor Carpet
..
 Front Bumper
..
Other information:
Hyundai Palisade (LX2) 2020-2025 Service Manual: Brake oil
Specifications Specification Fluid Type DOT 3 or DOT 4 Reservoir Quantity (cc) Total A + B + C + D + E + F 460 ± 20 MAX LEVEL A + B + C + D + E 440 ± 20 MIN LEVEL B + C + D + E 165 ± 20 ON LEVEL C + D + E 135 ± 10 PARTIAL LEVEL D Pri : 60 ± 5 D Sec : 50 ± 5 CLUTCH LEVEL F 15 ± 5 Repair procedures Replacement • Be careful not to damage the parts located under the vehicle (floor under cover, fuel filter, fuel tank and canister) when raising the vehicle using the lift...
Hyundai Palisade (LX2) 2020-2025 Service Manual: Idler
Repair procedures Removal and Installation • Be careful not to damage the parts located under the vehicle (floor under cover, fuel filter, fuel tank and canister) when raising the vehicle using the lift...
Categories
- Manuals Home
- 1st Generation Palisade Owners Manual
- 1st Generation Palisade Service Manual
- Child-Protector Rear Door Locks
- How to reset the power liftgate
- AC Inverter
- New on site
- Most important about car
Air Bag - Advanced Supplemental Restraint System
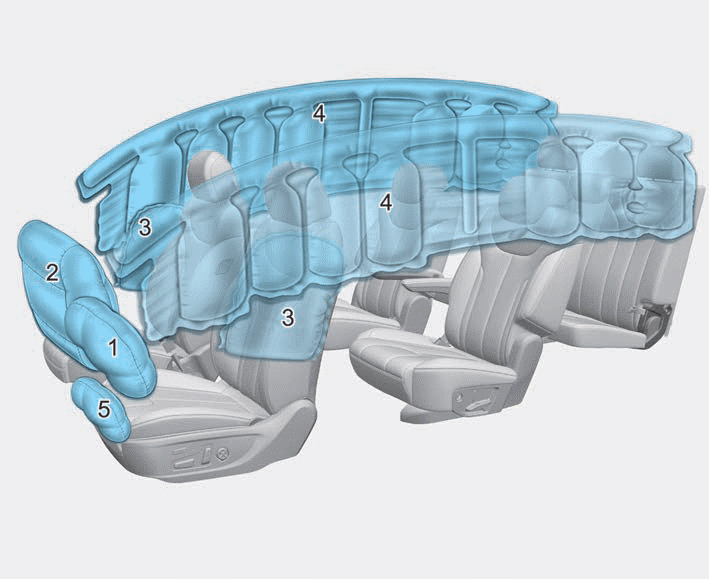
1. Driver's front air bag
2. Passenger's front air bag
3. Side air bag
4. Curtain air bag
5. Driver’s knee airbag
This vehicle is equipped with an Advanced Supplemental Air Bag System for the driver's seat and front passenger's seats.

Copyright © 2025 www.hpalisadelx.com