Hyundai Palisade: Body Side Molding / Roof Rack
Components and components location
| Components Location |

| 1. Roof rack assembly |
Repair procedures
| Removal |
|
| 1. |
Loosen the nuts and remove the roof rack assembly (A).
|
| 2. |
To install, reverse removal procedure.
|
 Roof Side Molding
Repair procedures
Replacement
•
When removing with a flat-tip screwdriver or remover, wrap protective
tape around the tools to prevent damage to components...
 Front Wheel Guard
Repair procedures
Replacement
•
When removing with a flat-tip screwdriver or remover, wrap protective
tape around the tools to prevent damage to components...
Other information:
Hyundai Palisade (LX2) 2020-2025 Owner's Manual: Automatic Door Lock and Unlock Features
Your vehicle is equipped with features that will automatically lock or unlock your vehicle based on settings you select in the cluster LCD display. Auto LOCK - Enable on Speed When this feature is set in the cluster LCD display, all the doors will be locked automatically when the vehicle exceeds 9 mph (15 kph)...
Hyundai Palisade (LX2) 2020-2025 Service Manual: Direct Electro Hydraulic Actuator Coupling
Components and components location Component Location 1. Trasaxle assembly 2. Transfer assembly 3. Propeller shaft assembly 4. Coupling assembly Components 1...
Categories
- Manuals Home
- 1st Generation Palisade Owners Manual
- 1st Generation Palisade Service Manual
- Power Outlet
- Wireless Cellular Phone Charging System
- Emergency liftgate safety release
- New on site
- Most important about car
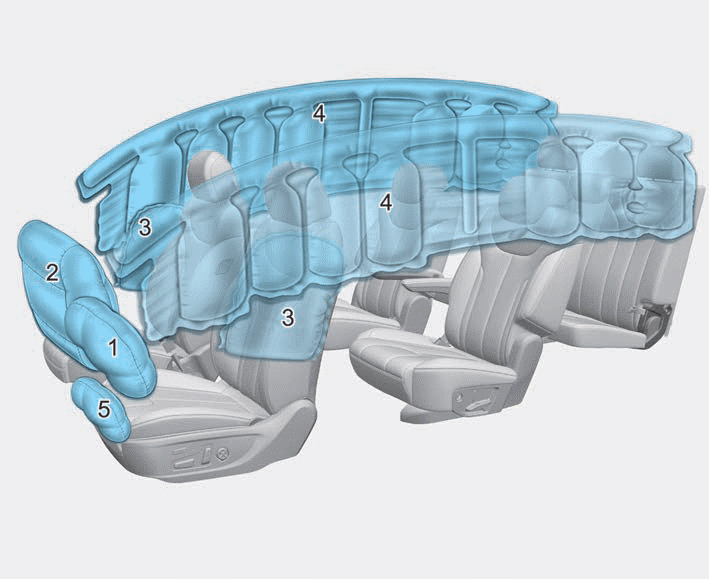
Air Bag - Advanced Supplemental Restraint System

1. Driver's front air bag
2. Passenger's front air bag
3. Side air bag
4. Curtain air bag
5. Driver’s knee airbag
This vehicle is equipped with an Advanced Supplemental Air Bag System for the driver's seat and front passenger's seats.
Copyright © 2025 www.hpalisadelx.com


