Hyundai Palisade: Roof Trim / Roof Trim Assembly
Hyundai Palisade (LX2) 2020-2025 Service Manual / Body (Interior and Exterior) / Roof Trim / Roof Trim Assembly
Components and components location
| Component Location |

| 1. Roof Trim Assembly |
Repair procedures
| Replacement |
|
|
| 1. |
Remove the front seat.
(Refer to Front Seat - "Front Seat Assembly")
|
| 2. |
Remove the rear seat.
(Refer to Rear Seat - "Rear Seat Assembly")
|
| 3. |
Remove the front pillar trim.
(Rear to Interior Trim - "Front Pillar Trim")
|
| 4. |
Remove the center pillar upper trim.
(Rear to Interior Trim - "Center Pillar Trim")
|
| 5. |
Remove the rear pillar trim.
(Rear to Interior Trim - "Rear Pillar Trim")
|
| 6. |
Remove the sunvisor and retainer.
(Rear to Roof Trim - "Sunvisor")
|
| 7. |
Remove the assist handle.
(Rear to Roof Trim - "Assist Handle")
|
| 8. |
Remove the overhead console lamp.
(Rear to Body Electrical System - "Overhead Console Lamp")
|
| 9. |
Remove the room lamp.
(Rear to Body Electrical System - "Room Lamp")
|
| 10. |
Remove the ECM mirror connector.
(Refer to Body Electrical System - "Electro Chromic Inside Rear View
Mirror")
|
| 11. |
Separate the roof trim main connector (A) from the front pillar section.
[LH]
[RH]
|
| 12. |
Remove the roof trim mounting clip and remove the roof trim assembly
(A).
|
| 13. |
Separate the roof trim various connector (A).
[Front]
[Center]
[Rear]
|
| 14. |
Remove the roof trim assembly (A) from the vehicle through the tailgate.
|
| 15. |
Remove roof trim wiring harness from the roof trim (A).
|
| 16. |
To install, reverse removal procedure.
|
 Assist Handle
Components and components location
Component Location
1. Assist handle
Repair procedures
Replacement
•
When removing with a flat-tip screwdriver or remover, wrap protective
tape around the tools to prevent damage to components...
Other information:
Hyundai Palisade (LX2) 2020-2025 Service Manual: Hood Latch
C..
Hyundai Palisade (LX2) 2020-2025 Service Manual: Direct Electro Hydraulic Actuator Coupling
Components and components location Component Location 1. Trasaxle assembly 2. Transfer assembly 3. Propeller shaft assembly 4. Coupling assembly Components 1...
Categories
- Manuals Home
- 1st Generation Palisade Owners Manual
- 1st Generation Palisade Service Manual
- Electrochromatic Mirror (ECM) with homelink system
- How to reset the power liftgate
- Power Outlet
- New on site
- Most important about car
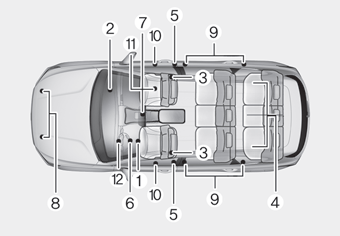
How Does the Air Bag System Operate?

The SRS consists of the following components:
1. Driver's front air bag module
2. Passenger's front air bag module
3. Side air bag modules
4. Curtain air bag modules
5. Retractor pre-tensioner
6. Air bag warning light
7. SRS control module (SRSCM)/
Rollover sensor
8. Front impact sensors
9. Side impact sensors
10.Side pressure sensors
11. Occupant classification system
12. Driver’s knee airbag module
Copyright © 2025 www.hpalisadelx.com


