Hyundai Palisade: Floor Console / Rear Console Cover
Components and components location

1. Rear console upper cover
|
2. Rear console under cover
|
Repair procedures
[Upper]
| • |
When removing with a flat-tip screwdriver or remover, wrap protective
tape around the tools to prevent damage to components.
|
| • |
Put on gloves to prevent hand injuries.
|
|
| • |
Use a plastic panel removal tool to remove interior trim pieces
without marring the surface.
|
| • |
Take care not to bend or scratch the trim and panels.
|
|
| 1. |
Using a flat-tip screwdriver or remover and remove the rear console
upper cover (A).

|
| 2. |
Separate the rear console upper cover connector (A) and remove the rear
console upper cover (B).

|
| 3. |
To install, reverse removal procedure.
| •
|
Make sure the connector is connected properly.
|
| •
|
Replace any damaged clips (or pin-type retainers).
|
|
|
[Under]
| • |
When removing with a flat-tip screwdriver or remover, wrap protective
tape around the tools to prevent damage to components.
|
| • |
Put on gloves to prevent hand injuries.
|
|
| • |
Use a plastic panel removal tool to remove interior trim pieces
without marring the surface.
|
| • |
Take care not to bend or scratch the trim and panels.
|
|
| 1. |
Remove the rear console assembly.
(Refer to Floor console - "Floor console assembly")
|
| 2. |
Loosen the mounting screws and remove the rear console under cover (A).

|
| 3. |
Press the lock pin and separate the connector (A).

|
| 4. |
To install, reverse removal procedure.
| •
|
Make sure the connector is connected properly.
|
| •
|
Replace any damaged clips (or pin-type retainers).
|
|
|
Components and components location
Component Location
1. Front console assembly
2. Rear console assembly
Repair procedures
Replacement
•
When removing with a flat-tip screwdriver or remover, wrap protective
tape around the tools to prevent damage to components...
Components and components location
Component Location
1. Console armrest
Repair procedures
Replacement
•
When removing with a flat-tip screwdriver or remover, wrap protective
tape around the tools to prevent damage to components...
Other information:
This information identifies and
describes the fundamental characteristics
of the tire and also provides
the tire identification number (TIN)
for safety standard certification. The
TIN can be used to identify the tire in
case of a recall.
1. Manufacturer or brand name
Manufacturer or brand name is
shown...
Consult an authorized HYUNDAI
dealer to replace most vehicle light
bulbs. It is difficult to replace vehicle
light bulbs because other parts of the
vehicle must be removed before you
can get to the bulb. This is especially
true for removing the headlamp
assembly to get to the bulb(s)...
Categories
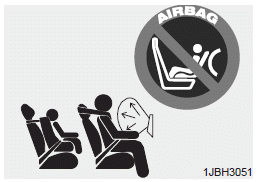
Even though your vehicle is equipped
with the OCS, never install a child
restraint in the front passenger's seat.
An inflating air bag can forcefully
strike a child or child restraint resulting
in serious or fatal injury.
read more


 Floor Console Assembly
 Console Armrest