Hyundai Palisade: Rear Heater / Rear Heater Unit
Hyundai Palisade (LX2) 2020-2025 Service Manual / Heating,Ventilation And Air Conditioning / Rear Heater / Rear Heater Unit
Components and components location
| Component Location |

| 1. Rear Heater & A/C Unit |
Repair procedures
| Replacement |
|

| 1. |
Disconnect the negative (-) battery terminal.
|
| 2. |
Recover the refrigerant with a recovery/charging station.
|
| 3. |
Remove the luggage side trim [RH]
(Refer to Body - "Luggage Side Trim")
|
| 4. |
Remove the rear wheel guard [RH].
(Refer to Body - "Rear Wheel Guard")
|
| 5. |
Loosen the mounting nuts and remove the refrigeration line (A).
|


| 6. |
Press the lock pin and separate the rear heater hose (A), loosen the
mounting bolts and remove the braket (B).
|


| 7. |
Loosen the mounting nuts, clips and remove the rear air duct (A).
[Upper]
[Lower]
|


| 8. |
Loosen the rear evaporator pipe (A) mounting bolts.
|

| 9. |
Remove the drain hose (A) from rear heater & A/C unit.
|

| 10. |
Press the lock pin and separate the blower motor connector (A) and rear
power mosfet connector (B).
|

| 11. |
Press the lock pin and separate the rear mode control actuator connector
(A) and rear temperature control actuator connector (B).
|

| 12. |
Loosen the mounting nuts, bolts and remove the rear heater & A/C unit
(A).
|

| 13. |
Install in the reverse order of removal.
|

 Rear Heater
..
 Rear Heater Core
Repair procedures
Replacement
1.
Remove the rear heater & A/C unit.
(Refer to Rear Heater - "Rear Heater Unit")
2...
Other information:
Hyundai Palisade (LX2) 2020-2025 Owner's Manual: Instrument Panel Overview
1. Instrument cluster 2. Driver's front air bag 3. Key ignition switch/ Engine Start/Stop button 4. Hazard warning flasher switch 5. Audio/Video/Navigation System 6. Manual climate control system/ Automatic climate control system 7. Automatic transmission shift button 8...
Hyundai Palisade (LX2) 2020-2025 Service Manual: Troubleshooting
Troubleshooting Symptom Probable cause Remedy Play in steering Loose yoke plug Retighten Loose steering gear mounting bolts Retighten Loose or worn tie rod end Retighten or replace as necessary Steering wheel operation is not smooth (Insufficient power assist) V-belt slippage Readjust Damaged V-belt Replace Low fluid level Replenish Air in the fluid Bleed air Twisted or damaged hoses Correct the routing or replace Insufficient oil pump pressure Repair or replace the oil pump Sticky flow control valve Replace Excessive internal oil pump leakage Replace the damaged parts Excessive oil leaks from rack and pinion in gear box Replace the damaged parts Distorted or damaged gear box or valve body seals Replace Steering wheel does not return properly Excessive turning resistance of tie rod end Replace Yoke plug excessively tight Adjust Tie rod and/or ball joint cannot turn smoothly Replace Loose mounting of gear box mounting bracket Worn steering shaft joint and/or Retighten Worn steering shaft joint and / or body grommet Correct or replace Distorted rack Replace Damaged pinion bearing Replace Twisted or damaged hoses Reposition or replace Damaged oil pressure control valve Replace Damaged oil pump input shaft bearing Replace Noise Hissing Noise in Steering Gear There is some noise with all power steering systems...
Categories
- Manuals Home
- 1st Generation Palisade Owners Manual
- 1st Generation Palisade Service Manual
- Removing and Storing the Spare Tire
- Fuse/Relay Panel Description
- Electrochromatic Mirror (ECM) with homelink system
- New on site
- Most important about car
Battery replacement
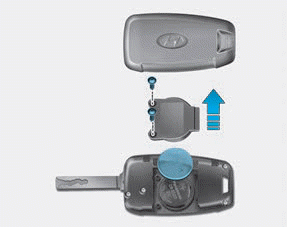
If the remote key is not working properly, try replacing the battery with a new one.
Battery Type: CR2032
To replace the battery:

Copyright © 2025 www.hpalisadelx.com